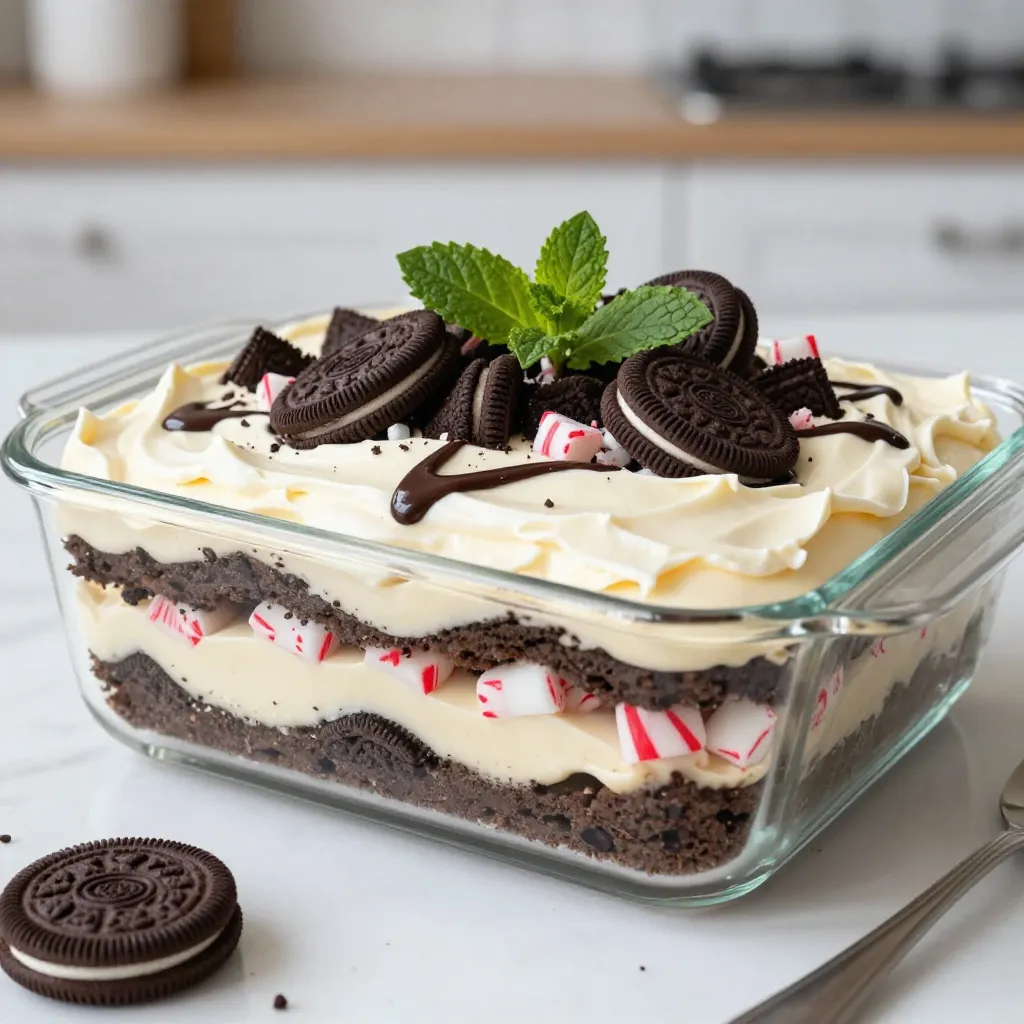
Are you ready to impress your guests this holiday season? My No-Bake Christmas Oreo Lasagna is a delicious, easy treat that everyone will love. With layers of crunchy Oreos, creamy filling, and festive peppermint, this dessert is a festive showstopper. Plus, you don’t need to turn on the oven! Follow along as I share all the steps to make this delightful dessert for your Christmas gatherings.
Why I Love This Recipe
- Festive Flavor Explosion: This dessert combines the rich taste of Oreo cookies with the refreshing crunch of peppermint, making it a perfect holiday treat.
- No-Bake Convenience: With no baking required, this recipe is simple and quick, allowing you to spend more time enjoying the festivities.
- Layered Delight: The multi-layered structure not only looks impressive but also provides a delightful mix of textures and flavors in every bite.
- Perfect for Sharing: This recipe serves 12, making it an ideal dessert for gatherings, parties, or any holiday celebration.
Ingredients
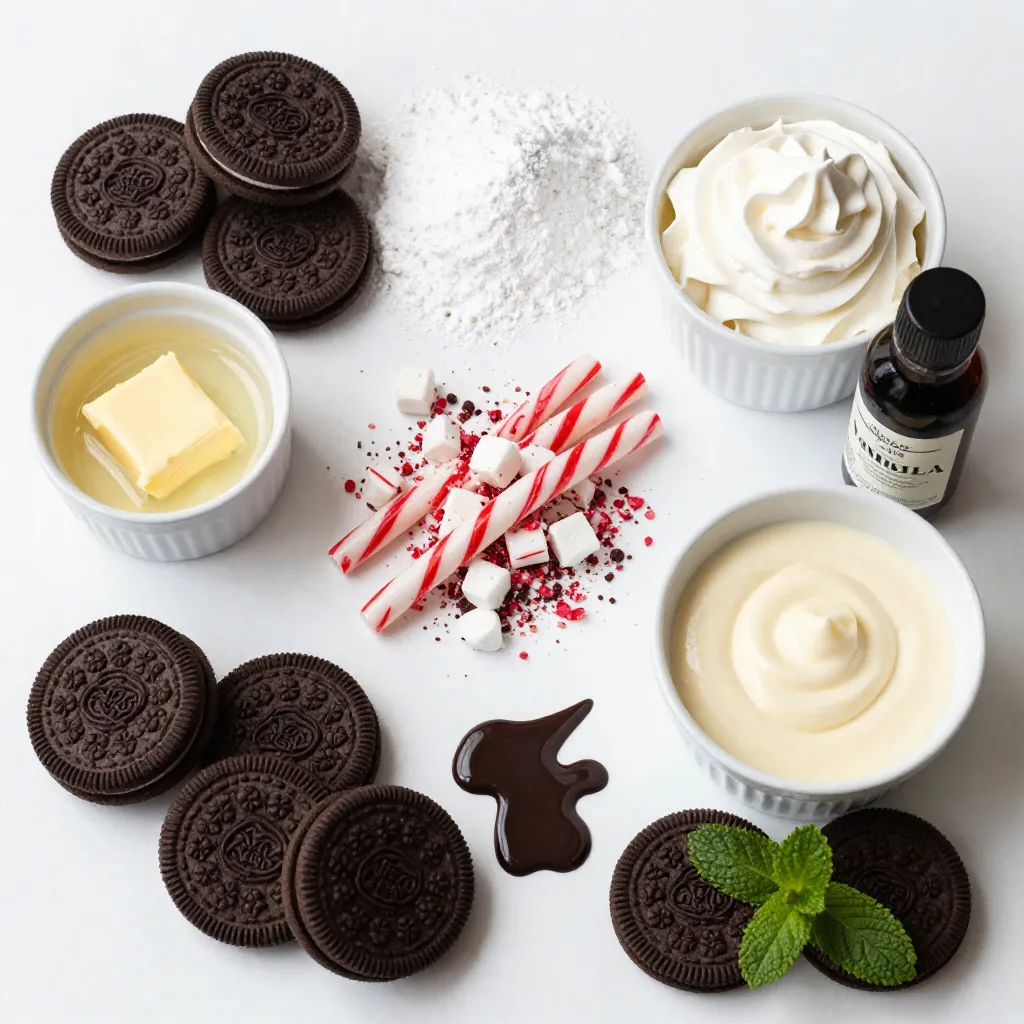
List of Ingredients
– 2 packages of Oreo cookies
– ½ cup unsalted butter
– 2 cups cream cheese, softened
– 1 cup powdered sugar
– 2 cups whipped topping
– 1 teaspoon pure vanilla extract
– 1 cup crushed peppermint candy canes
– 2 cups vanilla pudding mix
– ¼ cup chocolate syrup
– Additional crushed Oreos and fresh mint leaves for garnish
These ingredients create a fun and tasty No-Bake Christmas Oreo Lasagna. Each one adds flavor and texture.
Oreo cookies form the base. They give a sweet crunch. The unsalted butter binds everything together. Cream cheese adds a rich, creamy layer. Powdered sugar sweetens the mix.
Whipped topping gives a light and airy feel. Vanilla extract adds a warm flavor. Crushed peppermint candy canes bring a festive touch. They add color and a cool taste.
Vanilla pudding mix adds a smooth layer. Chocolate syrup makes it even sweeter. Finally, use crushed Oreos and mint leaves for decoration. They make your dessert look pretty and inviting.
Step-by-Step Instructions
Preparing the Crust
First, you need to crush the Oreo cookies. I use a food processor for this task. Crush 1.5 packages of Oreos until they become fine crumbs. Next, mix these crumbs with melted unsalted butter in a medium bowl. Make sure the butter is fully combined with the crumbs. Then, press the mixture evenly into the bottom of a 9×13 inch dish. This forms the base of your lasagna. Place the dish in the refrigerator to chill and set while you prepare the next layer.
Creating the Cream Cheese Layer
Now, it’s time to create the cream cheese layer. In a large mixing bowl, whip 2 cups of softened cream cheese with an electric mixer. Mix until smooth and creamy. Gradually add in 1 cup of powdered sugar and 1 teaspoon of pure vanilla extract. Keep mixing until everything is well combined. Then, gently fold in 2 cups of whipped topping, like Cool Whip. Make sure there are no lumps left. Carefully spread this cream cheese mixture over your chilled Oreo crust.
Adding Layers
Next, prepare the vanilla pudding. Follow the package instructions to make 2 cups of vanilla pudding. Once it has set and is creamy, spread it evenly over the cream cheese layer. After that, sprinkle half of the crushed peppermint candy canes on top for a festive touch. Then, spread the remaining whipped topping over the peppermint layer. Drizzle ¼ cup of chocolate syrup over this layer. Finally, sprinkle the remaining crushed Oreos and crushed candy canes on top. This will add color and crunch to your dessert.
Make sure to cover the lasagna tightly with plastic wrap. Chill it in the refrigerator for at least 4 hours, or overnight if you can wait. When it’s ready, slice into squares and enjoy this delightful treat!
Tips & Tricks
Tips for Success
– Best practices for crushing Oreos: Use a food processor for quick and fine crumbs. If you don’t have one, put Oreos in a zip-top bag and crush them with a rolling pin. Make sure to crush them well for a solid crust.
– How to achieve a smooth cream cheese layer: Start with room-temperature cream cheese. This helps it blend easily. Use an electric mixer on medium speed to whip until creamy. Gradually add powdered sugar and vanilla. Mix until smooth, then gently fold in the whipped topping.
– Importance of chilling time: Chill the lasagna for at least 4 hours, or overnight if you can. Chilling helps the layers set and brings all the flavors together. It’s key for the best taste and texture.
Serving Suggestions
– Ideas for garnishes: Top with crushed Oreos and crushed candy canes for a festive touch. Add fresh mint leaves for a pop of color and flavor. You can also drizzle more chocolate syrup for extra sweetness.
– Pairing suggestions with beverages or other desserts: This lasagna pairs well with hot cocoa or peppermint tea. Serve it alongside vanilla ice cream for a creamy treat. You can also offer coffee or a light dessert like fruit salad to balance the sweetness.
Pro Tips
- Crust Consistency: Make sure to press the Oreo crust firmly into the bottom of the dish to create a sturdy base that holds the layers together.
- Chill Time: For the best flavor and texture, refrigerate the lasagna overnight. This allows the layers to meld together beautifully.
- Pudding Preparation: Ensure that the vanilla pudding is prepared according to package instructions and allowed to set properly before layering it on the cream cheese mixture.
- Garnish with Care: When garnishing, sprinkle crushed peppermint and Oreos just before serving to maintain their crunch and vibrant colors.
Variations
Flavor Variations
You can easily switch up the flavor of your No-Bake Christmas Oreo Lasagna. Try using different types of cookies. For example, mint Oreos give a fresh twist. You can also use golden Oreos for a lighter taste.
Toppings can change the look and taste too. Drizzle caramel sauce over the whipped topping for a sweet surprise. Chopped nuts add a nice crunch. Get creative and make it your own!
Dietary Adjustments
If you need a gluten-free option, use gluten-free Oreo cookies. They work just as well. You won’t lose any of the tasty flavor!
For vegan alternatives, swap cream cheese with a vegan cream cheese. Use coconut whipped cream instead of traditional whipped topping. These changes keep the dessert creamy and delicious without dairy.
Storage Info
Refrigeration Tips
To store leftovers, cover the No-Bake Christmas Oreo Lasagna tightly with plastic wrap. This helps keep moisture in and prevents it from drying out. Place it in the fridge to maintain its cool, creamy texture. If stored properly, it can last for up to five days. Keep an eye on the layers; if they start to separate, it’s best to enjoy it sooner than later.
Freezing Information
Can No-Bake Oreo Lasagna be frozen? Yes, you can freeze it! To freeze, cut the dessert into squares before wrapping each piece in plastic wrap. This makes it easy to grab a piece later. Place the wrapped pieces in an airtight container or freezer bag. Thaw it in the fridge overnight when you’re ready to enjoy it again. This way, the layers stay intact, and you can savor that delicious taste!
FAQs
How long does it take to set?
Your No-Bake Christmas Oreo Lasagna needs at least 4 hours to set. I often let it chill overnight. This gives the layers time to firm up and blend flavors.
Can I make this ahead of time?
Yes! You can make this dessert up to two days in advance. Just keep it covered in the fridge. This helps the flavors deepen and makes serving easy.
What is the best way to cut the lasagna?
To cut the lasagna nicely, use a sharp knife. Dip the knife in warm water before each cut. This helps create clean slices without tearing the layers apart.
Can I use homemade whipped cream instead of Cool Whip?
Absolutely! Homemade whipped cream works great. Just whip heavy cream with a bit of sugar until stiff peaks form. It adds a fresh taste to the dessert.
Are there any alternative ingredients I can use?
You can swap Oreo cookies for other cookies, like chocolate or peanut butter ones. For a dairy-free option, use coconut cream instead of cream cheese. You can also use dairy-free whipped topping.
This blog post walks you through making a tasty No-Bake Oreo Lasagna. You learn about the key ingredients and easy steps to create it. Tips for success and variations help you customize your dessert. Plus, I provide storage advice to keep it fresh.
In conclusion, enjoy this fun and sweet treat with friends and family. You can mix it up or stick to the classic. Whichever way you choose, it will surely impres