Are you ready to satisfy your sweet tooth with a simple, delicious dessert? Let me introduce you to No Bake Oreo Cheesecake Bars! This easy recipe combines creamy cheesecake and crunchy Oreo goodness, perfect for any occasion. You won’t need an oven, just simple ingredients and a bit of chilling time. Dive into this delightful treat with me, and I’ll guide you step-by-step to create your new favorite dessert!
Why I Love This Recipe
- Decadent Flavor: This no-bake Oreo cheesecake bars are rich, creamy, and packed with the delightful taste of Oreos, making them a favorite for dessert lovers.
- Easy Preparation: With no baking required, this recipe is simple and quick to put together, making it perfect for beginner bakers or last-minute gatherings.
- Chilled Delight: These cheesecake bars are served cold, making them a refreshing treat, especially during warm weather or summer parties.
- Customizable Toppings: Add your favorite toppings like chocolate sauce or fresh fruit to personalize each serving and impress your guests.
Ingredients
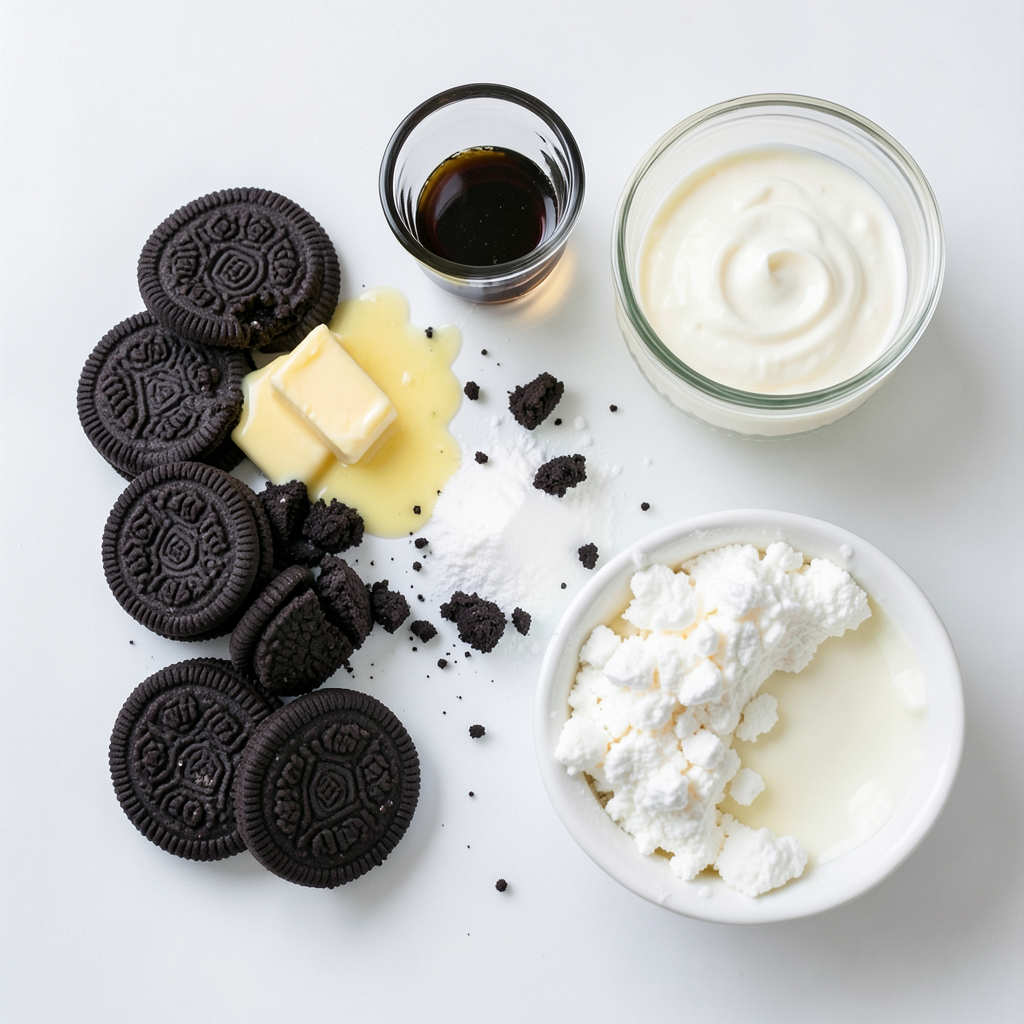
List of Ingredients
- 24 Oreo cookies, finely crushed
- 1/4 cup unsalted butter, melted
- 2 (8 oz) packages cream cheese, at room temperature
- 1/2 cup powdered sugar
- 1 teaspoon pure vanilla extract
- 2 cups heavy whipping cream
- 1/2 cup additional Oreo cookie crumbles (for topping)
To create these no bake Oreo cheesecake bars, you need some simple ingredients. First, the main star is the Oreo cookies. Their chocolate flavor gives the bars a rich taste. You will crush these cookies finely and mix them with melted butter. This mixture forms a crunchy base.
Next, cream cheese comes in. Make sure it is at room temperature. This helps it blend smoothly. You will mix the cream cheese with powdered sugar and vanilla extract. These add sweetness and flavor to the filling.
Heavy whipping cream is the next ingredient. You will whip it until it forms soft peaks. This creates a light and airy texture. Gently fold this into the cream cheese mixture. This step is essential for a fluffy cheesecake.
Lastly, you will need some extra Oreo crumbles. Sprinkle these on top for a nice finish. They add a little crunch and look great. With these ingredients ready, you can make a delightful treat everyone will love!
Step-by-Step Instructions
Preparing the Oreo Crust
To start, combine 24 finely crushed Oreo cookies with 1/4 cup of melted unsalted butter. Mix well until the crumbs fully coat with butter. Next, press this mixture firmly into the bottom of a 9x9 inch baking dish. Make sure it’s even and compact. Now, chill it in the fridge for 15 minutes. This will help the crust set.
Making the Cream Cheese Filling
In a large mixing bowl, beat 2 packages (8 oz each) of softened cream cheese until it is smooth. There should be no lumps in your mixture. Gradually add in 1/2 cup of powdered sugar and 1 teaspoon of pure vanilla extract. Mix until everything is silky and well combined.
Folding in the Whipped Cream
In a separate bowl, whip 2 cups of heavy cream until you see soft peaks form. This step is key for a light texture. Now, gently fold this whipped cream into the cream cheese mixture. Use a spatula to keep the airiness intact. This will create a fluffy filling.
Assembling the Cheesecake Bars
Spread the cream cheese filling evenly over your chilled Oreo crust. Make sure to smooth the top with your spatula. For extra crunch, sprinkle 1/2 cup of additional Oreo cookie crumbles on top. Cover the dish with plastic wrap or a lid and place it in the fridge. Let it chill for at least 4 hours. This allows the bars to firm up nicely. After chilling, cut into squares and serve cold for the best texture.
Tips & Tricks
Ensuring a Smooth Texture
To get a creamy cheesecake, leave your cream cheese out. It should sit at room temperature for about an hour before you start. This step helps it blend smoothly. When you mix in the whipped cream, be gentle. Avoid overmixing, or you will lose the fluffiness.
Presentation Suggestions
Serving your cheesecake bars on a white platter makes them pop. It shows off that rich, creamy layer. Add a few fresh mint leaves on top for a splash of color. A drizzle of chocolate sauce adds a sweet touch and makes it fancy.
Common Mistakes to Avoid
One common mistake is using cold cream cheese. This makes it hard to mix and leaves lumps. Another mistake is skipping the chilling time. Give your bars at least four hours in the fridge to set properly. This wait makes them firm and easy to cut.
Pro Tips
- Chill Your Bowl: Before whipping the heavy cream, chill the mixing bowl and beaters in the freezer for about 10 minutes. This will help the cream whip up faster and achieve a better volume.
- Room Temperature Cream Cheese: Ensure your cream cheese is at room temperature for a smoother mixture. Cold cream cheese can lead to lumps in your cheesecake filling.
- Use a Sharp Knife: When cutting the cheesecake bars, use a sharp knife and dip it in hot water before slicing. Wipe it clean between cuts for neat, clean edges.
- Allow for Extra Chill Time: If you can, let the cheesecake bars chill overnight. This will enhance the flavors and improve the texture, making them even more delicious.
Variations
Flavor Swaps
You can easily change the flavor of your No Bake Oreo Cheesecake Bars. Try adding mint extract for a fresh, minty twist. Just a teaspoon can make a big difference. If you love peanut butter, mix some into the cream cheese filling. Start with half a cup and taste as you go. These swaps can bring a fun new taste to a classic treat!
Different Cookie Options
If you have dietary needs, use gluten-free Oreos. They work great in the crust and taste just as good. Want to get creative? Try other sandwich cookies like Chips Ahoy or even Nutter Butters. Each cookie brings a unique flavor. This way, you can enjoy different versions of your favorite dessert!
Storage Info
Proper Storage Techniques
To keep your No Bake Oreo Cheesecake Bars fresh, store them in an airtight container. This helps prevent them from drying out. You can keep them in the fridge for up to 5 days. Always remember to cover them well. This keeps the flavors intact and tasty.
Freezing Instructions
If you want to save some for later, you can freeze these bars. They can stay good in the freezer for up to 2 months. To eat, just take them out and thaw in the refrigerator. This way, they maintain their lovely texture and flavor. Enjoy them chilled for the best taste!
FAQs
How long do No Bake Oreo Cheesecake Bars last?
No Bake Oreo Cheesecake Bars can last up to five days in the fridge. To keep them fresh, store the bars in an airtight container. This helps prevent them from drying out. If you notice any signs of spoilage, like an off smell or change in texture, it is best to toss them.
Can I make this recipe ahead of time?
Yes, you can make these bars a day or two ahead. This helps the flavors blend well. Just follow the recipe and let them chill for at least four hours. Once set, cover them tightly and keep them in the fridge. They will be ready when you are for your next gathering or sweet craving.
What is the best way to cut cheesecake bars?
To cut cheesecake bars cleanly, use a sharp knife. Dip the knife in hot water, then wipe it dry. This helps to make neat cuts. For even squares, cut the bars into rows first and then cut across. Clean the knife between cuts to keep the edges smooth. This way, your bars will look as good as they taste!
The No Bake Oreo Cheesecake Bars are easy to make and delicious. Start with crushed Oreos for a tasty crust. Mix cream cheese, sugar, and vanilla for the filling. Fold in whipped cream for a light texture, then assemble everything. Chill and enjoy your sweet treat!
Remember, you can customize this recipe with flavors or different cookies. Follow the tips to avoid mistakes and enhance your bars. Store them properly for long-lasting freshness. Now, get ready to impress everyone with your delicious creation!