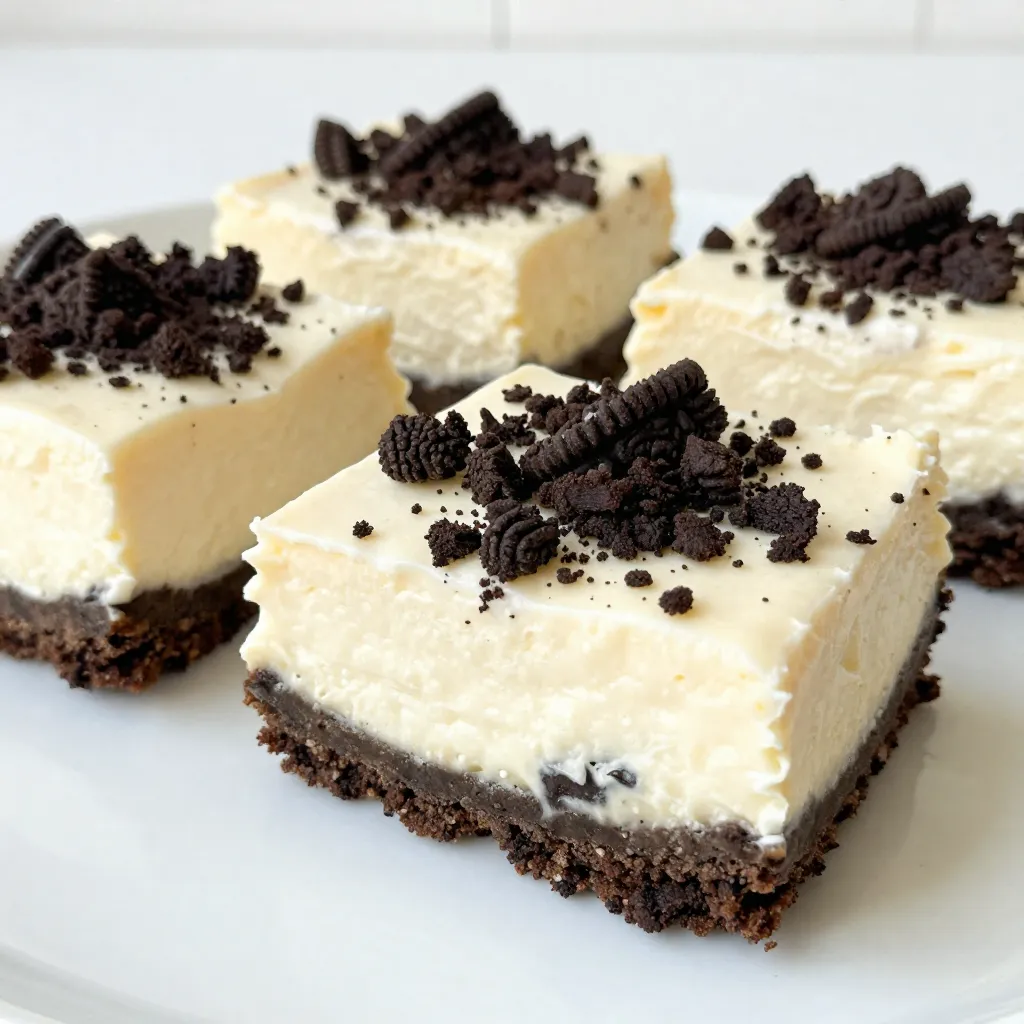
Are you ready to make a dessert that’s both easy and delicious? These No-Bake Oreo Cheesecake Bars are perfect for any sweet tooth craving. With just a few simple ingredients, you can create a creamy, chocolatey treat that will impress everyone. I’ll guide you step-by-step, ensuring you achieve the best texture and flavor. Let’s dive in and start whipping up this mouthwatering delight!
Why I Love This Recipe
- Decadent Flavor: The combination of cream cheese and Oreo creates a rich and indulgent taste that is irresistible.
- Easy to Make: This no-bake cheesecake bar recipe requires minimal effort, making it perfect for busy bakers.
- Perfect for Sharing: Cut into bars, these treats are great for parties and gatherings, allowing everyone to enjoy a piece.
- Customizable: Add your favorite toppings or mix-ins to make these bars uniquely yours!
Ingredients
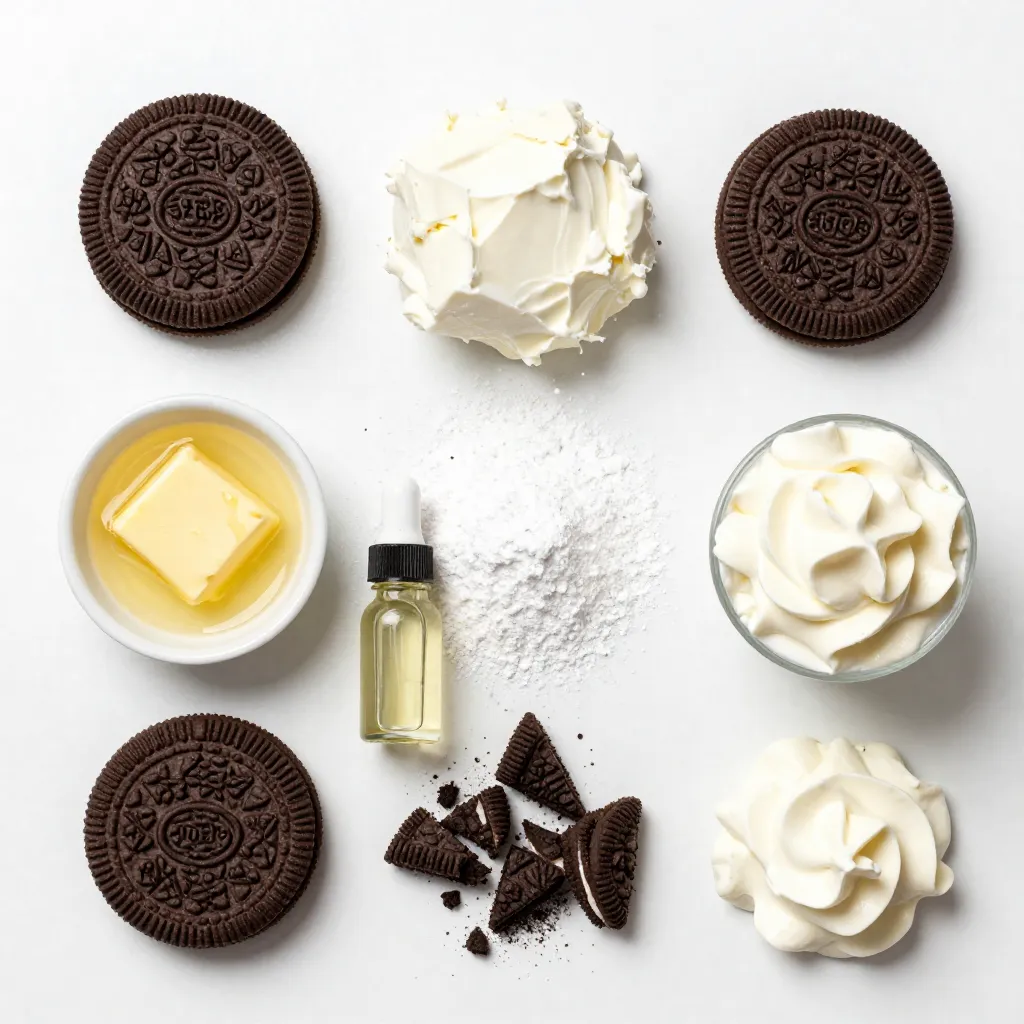
Main Ingredients
– 24 Oreo cookies, finely crushed
– 4 tablespoons unsalted butter, melted
– 16 ounces cream cheese, at room temperature
– 1 cup powdered sugar
– 1 teaspoon pure vanilla extract
– 1 cup heavy whipping cream
– 10 Oreo cookies, roughly chopped for both filling and garnish
These main ingredients create a rich and creamy cheesecake. The Oreo cookies form the base and add flavor. Cream cheese gives the filling its smooth texture. Heavy whipping cream adds lightness to the mix.
Optional Ingredients
– Whipped cream for topping
– Additional mix-ins (e.g., chocolate chips, caramel sauce)
Optional ingredients can enhance your bars. Whipped cream on top makes them even more special. You can add chocolate chips or caramel for a twist. Customize your cheesecake bars to suit your taste!
Step-by-Step Instructions
Preparing the Crust
1. In a medium bowl, combine 24 crushed Oreo cookies with 4 tablespoons of melted butter.
2. Mix until the crumbs are fully coated with butter.
3. Transfer the mixture to a 9×9 inch baking pan.
4. Press it firmly into the bottom, creating an even layer.
5. Place the pan in the fridge while you prepare the filling.
Making the Cheesecake Filling
1. In a large bowl, beat 16 ounces of softened cream cheese until it is smooth.
2. Gradually add 1 cup of powdered sugar and 1 teaspoon of vanilla extract.
3. Mix well for about a minute until smooth and lump-free.
4. In another bowl, whip 1 cup of heavy cream until stiff peaks form. This takes about 3 to 5 minutes.
Assembling and Chilling
1. Gently fold the whipped cream into the cream cheese mixture using a spatula.
2. Carefully incorporate 10 roughly chopped Oreo cookies, saving some for garnish.
3. Remove the crust from the fridge and pour the cheesecake filling over it.
4. Spread the filling evenly with a spatula.
5. Cover the pan with plastic wrap and refrigerate for at least 4 hours, or overnight for the best results.
Tips & Tricks
Achieving the Perfect Texture
To whip cream to stiff peaks, use a clean bowl. Make sure your heavy cream is cold; this helps it whip better. Start mixing on low speed, then increase to medium-high. In about 3-5 minutes, you will see stiff peaks form. This means the cream holds its shape well.
To avoid lumps in your cheesecake filling, ensure your cream cheese is at room temperature. Cold cream cheese mixes poorly. Beat it until smooth before adding any sugar or vanilla. Mix carefully to keep the texture creamy and light.
Customization Ideas
You can change up the flavors easily. Try using mint Oreo cookies for a fresh twist. You could also swap in peanut butter cookies for a nutty flavor. Another option is to mix in flavored extracts, like almond or orange.
For the crust, think outside the box. You can use graham cracker crumbs if you want something different. If you need a gluten-free option, check for gluten-free cookie brands. They work just as well.
Serving Suggestions
When cutting the bars, use a sharp knife dipped in hot water. This helps make clean cuts. For a fun touch, try cutting them into fun shapes with cookie cutters.
For garnishing, add a dollop of whipped cream on top. You can sprinkle the reserved chopped Oreos for extra crunch. Fresh berries also add a bright color and taste.
Pro Tips
- Use Room Temperature Ingredients: Ensure your cream cheese is at room temperature for a smooth filling. This helps avoid lumps and creates a creamy texture.
- Chill Longer for Best Results: For the best flavor and texture, chill the cheesecake bars overnight. This allows the flavors to meld and the filling to set properly.
- Garnish Creatively: Consider topping your cheesecake bars with chocolate drizzle, extra crushed Oreos, or fresh berries for an added visual appeal and flavor contrast.
- Cut with Warm Knife: For clean cuts, dip your knife in hot water and wipe it dry before slicing the bars. This prevents the filling from sticking to the knife.
Variations
Flavor Variations
You can easily change the flavor of your cheesecake bars. Try making mint Oreo cheesecake bars. Just use mint-flavored Oreos instead of regular Oreos. The mint adds a fresh taste that is perfect for summer.
Another fun option is peanut butter Oreo cheesecake bars. Add peanut butter to the cream cheese mixture. This gives a rich and nutty flavor that pairs nicely with the Oreos.
Crust Alternatives
If you want to switch up the crust, consider using graham crackers. Crush them finely and mix with melted butter just like you do with Oreo cookies. This gives a lighter taste.
For those who need gluten-free options, use gluten-free cookies. Many brands offer gluten-free Oreos or similar cookies. This way, everyone can enjoy these tasty bars.
Topping Alternatives
Toppings can make your cheesecake bars even more special. A chocolate ganache drizzle is a great choice. Just melt some chocolate with cream and pour it over the top. It adds a rich and smooth finish.
You could also top your bars with fresh fruit. Strawberries, raspberries, or blueberries work well. They add a pop of color and a burst of flavor that brightens each bite.
Storage Info
Refrigeration Guidelines
To store leftovers, place the cheesecake bars in an airtight container. You can also cover the pan tightly with plastic wrap. This keeps them fresh and tasty. I recommend chilling them for at least 4 hours. For the best texture and flavor, chill overnight if you can.
Freezing Instructions
You can freeze these cheesecake bars for a longer shelf life. First, cut the bars into squares. Wrap each square in plastic wrap. Then place them in a freezer-safe container. To thaw, simply transfer the bars to the fridge overnight. You can also let them sit at room temperature for about 30 minutes.
Shelf Life
These cheesecake bars are best eaten within a week. They will taste great for up to 5 days in the fridge. Look for signs of spoilage like an off smell or changes in texture. If you see any mold, it’s best to throw them away.
FAQs
Can I use low-fat cream cheese?
Yes, you can use low-fat cream cheese. It makes the bars lighter but may alter the taste. The bars will still be creamy but might not be as rich. If you enjoy a lighter flavor, this option works well. Just remember that low-fat cream cheese can be softer, so your filling may be less sturdy.
How long do these bars need to chill?
These bars need to chill for at least 4 hours. For the best results, I suggest letting them chill overnight. This longer time helps the flavors blend and the bars set properly. If you rush the chilling, they may not hold their shape when you cut them.
Can I make these bars ahead of time?
Absolutely! These bars are perfect for making ahead. You can prepare them one or two days in advance. Just store them in the fridge, covered tightly. This way, you save time on the day you plan to serve them. Plus, they taste even better after resting in the fridge!
This blog post shows how to make tasty Oreo cheesecake bars. You learned about the main ingredients like Oreo cookies and cream cheese. The step-by-step instructions guide you through making the crust and filling.
With tips for great texture and fun ways to customize, these bars will impress everyone. You can even store them easily or make them ahead. Now, get ready to enjoy delicious cheesecake bars at your next gatherin